
What is LOCA Glue?
Loca glue, also known as UV glue, is an optically-clear liquid adhesive. This type of glue is used on a wide range of electronic equipment, especially with touch panels found in today’s smartphones. This liquid sticks the touch panel, or in this case the digitizer, to the LCD. It is used by many well known leading companies such as Apple for their iPhones and Samsung for their Galaxies.
LOCA Glue Research
Searching high and low on the internet, I can conclude that information on LOCA glue is very limited. This is why I decided to create this piece. Since there is little info on the subject, besides a Wikipedia page, I began contacting manufacturers of this UV glue. Here are my findings:
- The chemical composition of LOCA glue is Urethane Acrylic.
- Water base
- Urethane allows the glue to be more durable and scratch resistant
- Since it is a water base and not an oil base, it doesn’t yellow when cured
- The viscosity of LOCA adhesive is typically 1600 mPa.s at 25℃.
- Viscosity represents the thickness of the mixture
- It can range from 1000 to 3000 mPa.s
- For comparison, water at the same temperature has a viscosity of 0.90 mPa.s
- For comparison, corn syrup at the same temperature has a viscosity of 1381 mPa.s
- Liquid optically clear adhesive typically shrinks less then 2% when cured.
- It can ignite if it reaches a temperature greater then 93℃.
- Density of this UV glue is typically 1.06 g/cm³ at 25℃.
- It can range from 1.0 to 1.1 g/cm³
- Has a workable temperature of -50℃ to 160℃.
- LOCA glue should be stored in a cool dry place that is between 8 to 28℃.
- Has a shelf life of 6 months
- Close the lid right after use
- Avoid exposing the glue to light
- Elongation at break: 60% ASTM
- Tg: 100℃
- Hardness: 50A
- Electrical properties of LOCA Glue:
- Volume resistivity: 3.4×10¹⁴ ASTM
- Surface resistivity: 8.1×10¹⁴ ASTM
- Dielectric strength: 22 ASTM
- Volume resistivity: 3.4×10¹⁴ ASTM
- After LOCA is cured:
- Tensile strength: 18 N/mm2
- Water absorption: 0.80%
- LOCA does contain acrylic resin therefore keep away from eyes and put it in a place away from children.
The Introduction of LOCA Repair
Earlier, if a smartphone got cracked, repair shops would simply switch out the screen assembly. The problem with this was that in most cases the LCD was not damaged at all. Yet, it was impossible to separate the cracked glass from it.
The introduction of LCD separator machines allowed an even disbursement of heat that a heat gun could not achieve. Profits from glass only repairs were almost double of what one would make if they just switched out an assembly.
Can You Use Regular Adhesive For Glass-only repairs?
The short and simple answer is no. When doing glass only repairs, you must use optically clear adhesive. Why? Well for one thing it is in the name; ‘optically clear’. LOCA glue acts as a barrier between the glass and the LCD. Older versions of smartphones used to use regular adhesive around the border of the LCD.
The problem with this is that not only is the touch signal not as responsive, it also leaves room for dust to get in between. Therefore this type of UV glue was introduced. For the iPhone, Apple began using it with the iPhone 4. This liquid glue makes it ideal for filling in any tiny gaps in the displays that might have been caused by the cracked screen. It won’t leave any noticeable mark that can be later identified.
If you attempt to use any other glue, the quality will not be the same. LOCA glue allows minimum reflection to occur. It allows light to travel from the LCD and out from the glass with minimal light being lost in between.
The issue is that reflection is caused by an impedance mismatch between air and the glass that makes the white brighter, but decrease the other contrast.
While keeping this thing in mind, LOCA suppliers try to match the refractive index of glass and clear plastic used in displays to minimize the color loss. Furthermore, LOCA glue is highly heat resistant which prevents condensation or fogging on the lens that can be caused by the hot display .
Another reason not to use any other glue is that it might not dry clear. I have heard many cases where when the glue has dried, it gives off a yellow hue. You do not want this! LOCA glue dries crystal clear and stays that way, even as the phone ages.
If you are going to do glass only repairs, use the right adhesive. Liquid optically-clear adhesive is the perfect ideal bonding agent for all LCD display devices.
How to Separate Glass From LCD
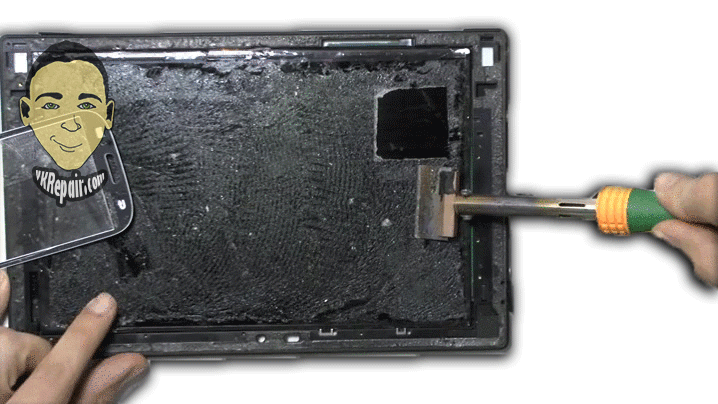
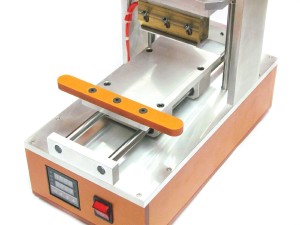
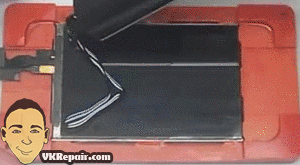
Separating the glass from the LCD can be quite tricky, especially if the glass is severely cracked. If you attempt to take the glass off without the right tools, you will damage the LCD. The bond between the glass and LCD is very strong. The LOCA glue must be heated in order to loosen this bond. This can be done with a heat gun, however this is not the best tool for the job.
Heat must be dispersed as evenly as possible through out the glass. You need to have a consistent temperature throughout to avoid damaging the LCD. This can be done using an LCD separator machine, a tool that is like a hot plate. Take a look at the video below done by JCD Repair, a professional repair shop that knows what they are doing.
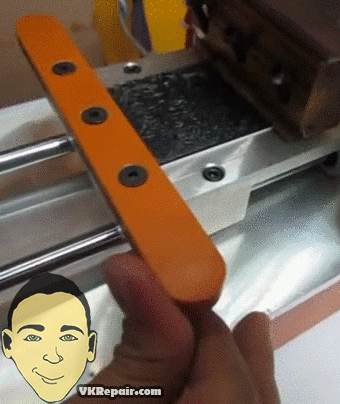
In regards to what tool to use to get between the LCD and glass, there are two that I would recommend. In the video, he is using a tool that is very similar to the iSesamo. This is basically a thin piece of metal. The other tool I would recommend is molybdenum wire. This wire is thin, but strong and heat resistant.
Note the differences between an iPhone repair verse a Samsung Galaxy repair. With Samsung Galaxies, you will want to use the iSesamo tool as the glass is glued to the case itself. With iPhones, the display assembly can be separated. This means you can place the assembly back onto the hot plate, clamp it down, and run the molybdenum wire between the glass and the LCD.
How to remove LOCA Glue
When doing these repairs, the loca glue will still be on the LCD display even after the glass has been taken off. The adhesive is very durable and strong. In order to remove it from the display you will have to use a product that can remove adhesive, and not damage the screen. There are many solutions out there that claim to be able to remove LOCA, but many of them actually do not work.
I have tried a hand full, and only 1 of these sort of works. It is the SGR LOCA Remover. They also make them in the form of wipes, which work pretty good. Wipes are better then the spray as the spray might get in between the LCD glass.
Paired up with some plastic razors, it makes removal easier, but it is still difficult to do and takes some time to master. It can be very time consuming to remove LOCA glue. If you are planning to scale your repairs, you need to get the right tools.
There are two alternatives to the plastic razor and the wipes. I suggest you first practice removing the glue with the method above before moving onto these tools. There are two tools that you can try out. The first is a hot blade LOCA remover. Basically it is a soldering iron with a blade attachment. You can either buy the whole kit or just the attachment.
How to use a hot blade to remove LOCA glue fast.
only have to finish off the job using the wipes to ensure a clean surface. It works just like a hot plate, except it focuses the heat all onto the blade. As you can see from above, the hot blade goes right through the glue without much effort. It takes off most off it, and you
How To Apply LOCA Glue
LOCA glue is all liquid and not as dense as other glues that you may have used before. Therefore you cannot just smear it onto the LCD. This part of the repair takes a lot of practice. The LOCA must be applied in the pattern shown above to avoid pesky little bubbles that could result in dropping the new screen too fast onto the LCD.
It is also important not to put too much of the glue. If you put too much, it can go onto the edges and get into the LCD itself. After you apply the glue onto the screen, make sure to close the lid on the container. Never put any extra LOCA back into the container as that will cause contamination.
 LOCA adhesive works slow to spread itself out once it has a grip of the glass, yet there is no need to apply any heavy pressure. Once the glass is slowly placed onto the glue, let it spread by itself. It should slowly move to the edges. Do not worry about the glue drying, we will get to that in the next part. If you notice any bubbles, simply apply a little pressure on the LCD and guide the bubble to the edge.
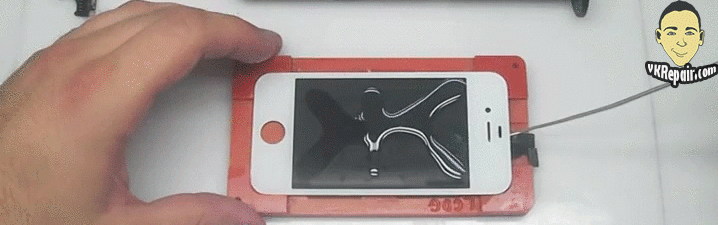
How to Prevent LOCA Glue From Getting in Between the Backlight
A common issue that a lot of beginners run into when trying to do glass only repairs is that the LOCA glue gets in between the backlight within the LCD. This causes the screen to look spotty in places when it is turned on. The only true way to prevent this is by not putting more adhesive then you need. However this takes time to master. Chances are it is going to happen to you. So how do you prevent it all together?
You must take the backlight off the LCD. It is soldered on so it requires at least some knowledge on how to desolder/ solder. You have two choices; you can either do the entire screen replacement and then replace the backlight with the new one. Alternatively, you can avoid the need to replace it with a new one by prepping for the repair beforehand.
- Desolder the backlight from the LCD.
- Apply blue painters tape to the back of the LCD.
- To prevent the LOCA glue from getting under the tape, run playing card or credit card along the tape to create a nice seal.
- Proceed with applying the LOCA glue and curing it.
- The back of the LCD should have uncured LOCA glue. Use a lint free rag to wipe the excess glue away. Cure the back of the LCD this time.
- Use compress air to get any LOCA from the sides and repeat the previous step until there is no uncured LOCA glue.
- Once you are sure that the glue has been cured, carefully remove the tape. If any uncured glue got onto the back of the LCD, do not smudge it. Carefully wipe the spot. If you do this wrong, the LOCA will be smeared all over the LCD.
- Make sure the area is clear of any dust and smudges and resolder the backlight onto the connection.
How to Cure LOCA Glue
The fascinating thing about this bonding glue is that it doesn’t dry normally. You must dry it using a uv light. The uv light causes a chemical reaction in the photons that get bonded within the loca. This results in a great bond between the glass and lcd. The great part about this is that if you mess up applying the glue, you can always take it off as it does not dry on you.
You can use any UV light on the market to cure the LOCA glue. However I recommend you use one that is at least 30W. The less watts, the longer it will take to dry. Curing time takes 30 seconds to 2 minutes. UV cure rate is dependent on the strength of the bulb, as well as the distance between the light source and the gap size between the LCD and the glass.
Put the assembly under the UV light with the glass facing up. After 2 minutes, remove it and inspect it. The glass should not be moving away from the LCD. Flip it over and use a lint free rag to wipe any excess glue that can be on the sides. I then put it back under the UV light, with the glass facing down for 1 minute. This ensures that both sides are cured.
There are a lot of UV lights on the market for LOCA repairs. Which one should you choose? As mentioned before, try to get one with at least 30W. However you can still get weaker UV lights, you just have to cure it for a longer time. I do not recommend you get one of those flashlight UV lights. For one thing, you will have to be holding this in the air for a few minutes.
The flashlights also focus their lights on a specific area of the screen and not the entire assembly. This means you will have to move it around to ensure the entire screen is cured.

Personally I use a UV nail dryer. These work best because they are stationary. All you do is slide the assembly in and you can do other things while the LOCA glue cures. Inside the dryer, the walls are mirrored, allowing the light to bounce back and cover every part of the assembly. This results in an even cure that the flash light does not provide.